Overview
Getting Started
Defining Regions
Saving and
Restoring Region Definitions
Computing Spectra and Errors
OSPEX Methods for
Region Selection
OSPEX Parameters
for Region Selection
To perform imaging spectroscopy in OSPEX, start with an image cube FITS file. Currently (October 2005), RHESSI and STIX are the only supported data type for image cube input (as of September 2017), but the software was written so that other data types can be added easily.
In order to form a spectrum from the image cube, you must define source region(s) in each image. For each image in the time/energy grid, the image flux values in the pixels enclosed by the selected region(s) are summed to form a single point in the spectrum for a time bin. Once the spectra are computed, you can proceed through OSPEX in a manner similar to if you had started with a spectrum FITS file. These are the only differences:
You don't need an SRM file since the data are already in photons.
You don't need to subtract background from the spectra derived from images.
You can not view the data as anything other than a rate or flux.
Since the data are already in photons, you can't view them in count space.
The photon flux in an image only takes into account the counts within the given energy range, i.e. there are no corrections for effects such as k-escape and compton scattering (the off-diagonal elements of the detector response matrix). Pileup effects are also not taken into account.
However, in February, 2006, an option was added to convert the photon flux back to a count flux, and calculate a full detector response matrix (SRM) to use in making a better estimate of the photon flux. In this mode (see the OSPEX parameter spex_image_full_srm, and more detail in the Computing Spectra and Errors section below), you can analyze images in lower energies, and you can view the data in count or photon space.
NOTE: If you want to analyze more than one spectrum from your image cube (separate regions or combinations of regions), you must step through the analysis in OSPEX for each spectrum separately.
Activate the OSPEX input widget (by clicking File / Select Input in the GUI, or by typing o->xinput at the command line) and select your image cube FITS file. When you select an image cube file of a recognized instrument (RHESSI and STIX as of September 2017), the input widget changes to include buttons for defining regions:

The Select Regions button has two options:
Configure Region Selection Parameters - this widget lets you select the name of IDL save files to read from and /or store your regions. You can also select the panel size of the images for the region selection panel display, and the expansion factor (for when you choose the 'Expand this image' option from the left-click pulldown in the region selection panel display), and the color table of the images.
Region Selection Widget - this brings up a panel display of your
images to allow you to select your regions. This is discussed in the
next section.
Once your regions are defined, use the region buttons in the 'Select Input' widget to select which region (or sum of regions) you will be analyzing. You can only analyze one region (or sum of regions) at a time. For example, if you define two regions and want to analyze them separately, check the box for Region # 0, uncheck the others, and perform your spectral analysis (for a single or multiple time intervals). Then uncheck the Region #0 box and check the Region #1 box, and analyze that (or those, for multiple time intervals) spectrum. If you want to analyze the spectrum made from both Regions 0 and 1 together, click both boxes, and perform the analysis.
The
'Calc Full SRM' option is explained in the Computing
Spectra and Errors section below.
To select regions in your images, use the Region Selection widget. You can start it by clicking the Select Regions-> Region Selection Widget button from the 'Select Input widget in the OSPEX GUI, or by calling the roi method:
o -> roi
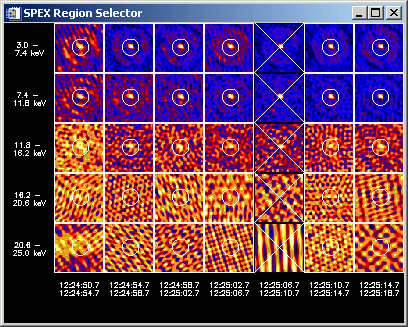
A panel display of all images in your image cube will appear. The following (not very good) example shows an image cube containing 7 time intervals and 5 energy bands in which I've selected a single region in every image except one time interval.
By left- and right-clicking in this widget, you are presented with options for selecting or deleting regions, and displaying spectra and time profiles. By left-clicking in an image and dragging to another image, you can select a group of images to work with at once (for defining regions, etc.) When you select options to show spectra or time profiles, the region number(s) in each image used to compute the data are controlled by the value selected in the Region # box on the 'Select Input' widget, (spex_roi_use and spex_roi_integrate parameters from the command line). Every time you change any region definitions, or the region number(s) to use, new spectra will be computed.
Up to 64 regions can be selected in each image (only 6 will be managed in the GUI interface, but you can work with more at the command line). The first region you define in an image is Region 0, the next Region 1, etc. You should define a region for every part of the image that contains a source, even if you don't plan to use all of the regions. This is because the error calculation assumes that everything outside all the regions is noise.
The region selections are stored in the object, so you can exit and re-enter the Region Selection widget any time without disturbing the regions. They are deleted from the object when you select a different input image cube file (see below for saving and restoring regions from files).
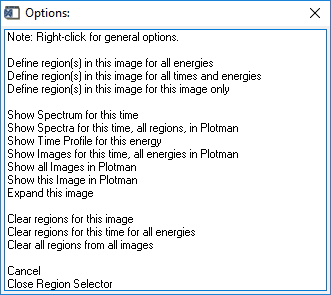
Left-click in a single image:
This list of options will appear when you left-click in a single image in the panel display:
If you click one of the 'Define region' options, a plotman window showing that image will open with the plotman mark_box interface for drawing single or multiple regions in that image. When accepted, the defined regions will be set for that single image, all the images, or the images at all energies in that time interval depending on which option you chose.
The 'Clear regions' options delete all the regions in the images specified.
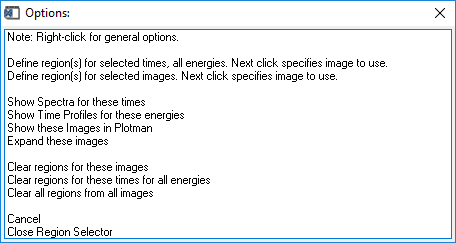
Left-click and drag for multiple images:
This list of options will appear when you left-click and drag in the panel display to select more than one image:
If you click one of the 'Define region' options, you have selected which images to apply the next region selection to, but you must then left-click in a single image to specify which image to use for defining the regions. Once you've made that single-click selection, a plotman window showing that image will open with the plotman mark_box interface for drawing single or multiple regions in that image. When accepted, the defined regions will be set for the set of images selected, or for the images at all energies in the time intervals selected depending on which option you chose.
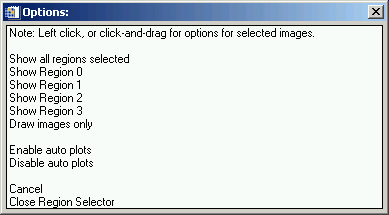
Right-click anywhere in panel display for general options:
This list of options will appear when you right-click anywhere in the panel display.
The 'Show Region x' options are useful for seeing how the regions are numbered - these correspond to the region specified by the Region # button in the 'Select Input' widget (spex_roi_use parameter).
The auto plots display the spectrum and time profile for whichever column and row the cursor is hovering over. As you move the cursor to different columns or rows, the plots will be redrawn automatically. This can be a little slow, so you probably want to disable it normally.
Configuring the Region Selection Widget
If you want to change the appearance of the panel display or ROI save file settings, close the panel display and use the Region Selection Options widget by clicking Select Regions -> Configure Region Selection Parameters from the Select Input widget, or by calling the roi_config method:
o -> roi_config
or by setting any of the ROI parameters directly at the command line.
Your region definitions can be stored in IDL save files so that you don't have to define them more than once.
Set spex_roi_infile (from the command line or from the Region Selection Options widget) to an existing IDL save file (previously written by OSPEX) to initialize regions. The regions in the save file must be compatible with the current image cube file (same number of times and energies). If spex_roi_infile is valid, the regions in the file will be restored into the object at the following times:
When you set the parameter spex_roi_infile.
When spectra are computed, if the current ROIs aren't valid.
When entering the Region Selection Widget, if the current ROIs aren't valid.
When you call the restore_roi method.
Set spex_roi_outfile (from the command line or from the Region Selection Options widget) to the name of an output IDL save file to save your regions. If spex_roi_infile is set, the current region definitions are stored in that file at the following times:
Whenever you change any region definition in any image.
When you call the save_roi method.
To check what an ROI save file contains, use the list_roi method:
o -> list_roi, 'filename.sav'
For each time interval, the image at each energy band contributes a single point to the spectrum. The result will be a spectrum for each time interval.
The spectrum point from a single image is computed by summing the photon flux (photons/cm^2/sec/arcsec^2) for all the image elements contained inside the region number(s) specified by spex_roi_use, or all regions if spex_roi_integrate is set, and multiplying by the area of each pixel. For rate output, this is multiplied by the detector area. For flux output, this is divided by the energy width.
The error on that point is computed by a technique Sam Krucker uses for CLEAN images - we find the maximum value of the image elements outside all defined regions, divide by the maximum value of the image elements in the regions used, and divide that by 3, i.e. (max_noise / max_signal / 3.). This error determination needs improvement. However, this error is normally used only for plotting the spectrum with error bars, but is not the error used when fitting the spectrum. The OSPEX parameter spex_error_use_expected controls what errors are used in fitting:
If the spex_image_full_srm option is set (RHESSI only), then the diagonal SRM is calculated and applied to the spectrum to convert to counts/cm^2/sec/arcsec^2 (basically reversing the conversion from counts to photons applied in the RHESSI image object). A full SRM incorporating all off-diagonal elements is calculated for each attenuator state that occurred during the time of the image cube, and stored in the spex_drm object for use in converting the spectrum to photon rate or flux. You will notice that if this option is set (spex_image_full_srm=1), you have the option to plot in count or photon space, whereas you can only plot in photon space if the option is not set. You can retrieve the calculated SRM in the same way you would normally retrieve data from any of the objects: drm = o->getdata(class='spex_drm'). Use the /all_filters keyword to get the drm matrix for all attenuator states. print o->get(/spex_drm_filter) prints the attenuator state values.
|
o -> roi |
Bring up the panel
display for defining regions. Keywords:
Example: o -> roi, panel_size=100, colortable=10 |
||||
|
o -> roi_config |
Bring up widget interface for setting Region Selection Parameters, including panel_size, expansion factor, colortable, and input and output ROI save file names. Keywords: none. | ||||
|
o -> save_roi |
Save region definitions
in an IDL save file. Arguments: spex_roi_outfile - name of save file. If not provided, will use o->get(/spex_roi_outfile). Keywords: any IDL save keywords will be passed to the save routine (e.g. /verbose) |
||||
| o -> restore_roi | Restore region
definitions from an IDL save file. Arguments: spex_roi_infile - name of save file to read. If not provided, will use o->get( /spex_roi_infile ) |
||||
| o -> list_roi | List information about
an ROI save file. The number of energies/times is displayed,
as well as the number of ROIs in each energy/time. Arguments: save_file - name of save file to summarize. If not provided, will use o->get(/spex_roi_infile) |
| spex_roi_use | Region number(s) to use to compute spectrum. Scalar or array. Default is 0. |
| spex_roi_integrate | Use all regions defined for each image to compute spectrum. Default is 0. |
|
spex_roi_size |
Size of each image in panel display in device pixels. Default is 50. |
|
spex_roi_color |
Color table number to use for panel display (0-40). Default is 5. |
|
spex_roi_expand |
The factor to expand selected images by in the Region selection tool. Default is 3. |
| spex_roi_infile | Name of input save file to read region selection from. To unset, set to blank string. |
| spex_roi_outfile | Name of output save file to write region selection in. To unset, set to blank string. |
Kim Tolbert
Last Modified: 28-Sep-2017