
Sample data plot
1.1 Creating an IDL object
1.2 Putting data into an object
1.3 Getting data out of an object
1.4 Destroying an object
2.1 Modifying object properties
2.2 Adding object methods
2.3 How does inheritance work?
3. APPLYING OBJECTS TO SOLAR IMAGES
3.1 Using MAP objects
3.2 Image analysis with objects
IDL objects were first introduced in version 5.0. The concept of object oriented programming (OOP) is not new. It is the basis of many modern languages such as C++ and Java. The idea behind OOP is that operations and data go hand in hand. Why? Because if you are handed a piece of data without any way of operating on it, then it would not be very useful to you. Furthermore, even if you were given software to operate on the data, the data may still not be useful without a set of rules to describe how the software interacts with it.
Consequently, the main thrust of OOP techniques is to keep operations and data married together so that they understand each other. This concept is called encapsulation. A valid question to ask is: what is wrong with non-OOP programming techniques in which procedures (or functions) are written to operate on data? For example, one can develop a reader to read a file, a plotter to plot it, and a writer to save it, as in the following pseudocode:
IDL> read,file,data IDL> plot,data IDL> write,file,data |
The short answer is that there is nothing wrong with using non-OOP techniques. The long answer is that, as data sets become complicated and operations more complex, simple procedures are no longer simple. Procedures often become a series of steps that are called repeatedly or they require enhancements to support different datasets, which were not originally considered. In the OOP world, these procedures are called methods. These methods operate on data in exactly the same way as regular non-OOP procedures but they are special in that they function differently depending on the data in question. This concept is called polymorphism and will be described in more detail in section 2.3
The purpose of this tutorial is not to make the case for using OOP
techniques in IDL, but to illustrate situations in which such techniques are
more advantageous than non-OOP techniques. We start with demonstrating how
to create a very basic IDL data object, followed by how to interact and
manipulate it, and finally how to apply it to a real world example of reading
and displaying a FITS image. Although not a strong pre-requisite, we assume
that the reader is familiar with the use of IDL pointers and structures.
An IDL object is simply a container in memory space. This container holds:
The first step in creating an object is deciding a name. The name is important because it should signify something about the the data. For example, if we are developing software to sell different types of cars, such as Fords, Toyotas, and Hondas, then the logical object name is probably car. This generic name is referred to as the object class. There is nothing special or magic about the name, although it should be unique. However, the name does become important later when we develop different objects.
Since we are keeping things simple - and are already thinking in terms of data - we name our object class data. We define this class in a file named data__define.pro that contains the following code:
function data::init

 return,1

end

pro data__define

 void={data,ptr:ptr_new()}
 return

end
|
So, what does the above all mean. Let's take it in steps:
|
|
Creating the data object is called instantiation. The IDL function call to obj_new('data') looks for the file data__define.pro, compiles it, and executes the init and structure definition code that creates the data object. Calling help on the output variable a shows that it is an object of class type data. In the language of OOP, the variable a is an instance of the data class. Currently, this object doesn't do very much other than waiting around for some data to come along and some operations to perform on the data.
function data::init

;-- allocate memory to pointer when initializing object

 self.ptr=ptr_new(/allocate)
 return,1

end

;----------------------------------------------------------------

pro data::set,value

;-- if data value exists, then insert into pointer location

 if n_elements(value) ne 0 then *(self.ptr)=value
 return

end

;------------------------------------------------------------------

pro data__define

 void={data,ptr:ptr_new()}
 return

end
|
Several things are going on that require explanation:
self.ptr=ptr_new(/allocate)
What is self? When we are working inside an object, we reference the object using the variable name self. The above line says:
"Take the structure field named ptr, which we have defined to be a pointer, and allocate new memory to it using the IDL pointer function ptr_new(/allocate)."
We only need to do this once when the data object is first created.
"Take my input data value and insert (or copy) it to this pointer location."
In the language of OOP, this action is called setting the object property.
In addition to inserting data, we need a method for extracting data from the object. We shall call this method data::get, and include it in the file data__define.pro as follows:
function data::init

;-- allocate memory to pointer when initializing object

 self.ptr=ptr_new(/allocate)
 return,1

end

;----------------------------------------------------------------

pro data::set,value

;-- if data value exists, then insert into pointer location

 if n_elements(value) ne 0 then *(self.ptr)=value
 return

end

;----------------------------------------------------------------

function data::get,value

;-- if data value is stored in object pointer, then copy it out

 if n_elements(*(self.ptr)) ne 0 then value=*(self.ptr)

 return,value

end

;------------------------------------------------------------------

pro data__define

 void={data,ptr:ptr_new()}
 return

end
|
The get method differs from set in that we have defined it to be a function. The choice of function versus procedure is more of a matter of convenience than convention. The function first checks for the existence of a data value at the pointer location self.ptr. If data is present, then the value *(self.ptr) is copied to the output variable value. If there is no data value, then an undefined value is returned.
When finished with using an object, it is recommended that the memory allocated to the object be released. All objects should therefore have a method that will take care of cleaning up after themselves. The IDL naming convention for this method is ::cleanup. In the case of the data object, this cleanup method would involve freeing the pointer property of any allocated data. To implement a cleanup method, we include the following lines in the file data__define.pro:
function data::cleanup ;-- free memory allocated to pointer when destroying object ptr_free,self.ptr return end |
The IDL procedure ptr_free flushes the pointer variable self.ptr of any saved data and re-initializes it. This method is not called directly. Instead it is called automatically when the object is destroyed using the IDL obj_destroy procedure as follows:
IDL> obj_destroy,a ;-- destroy object IDL> help,a A OBJREF = ObjHeapVar4 ;-- object is now null |
Having defined a data class, we next demonstrate how it can be
used in common applications, and how it can be extended to
perform different functions.
Because we have used a pointer as its property, the data object can accomodate any data type. For example, let's create a 2-dimensional float array and insert it and extract it as follows:
IDL> image=findgen(512,512)
IDL> a=obj_new('data')        ;-- create object variable a
IDL> a->set,image             ;-- insert image
IDL> image2=a->get()          ;-- extract image
IDL> help,image2
IMAGE2            FLOAT     = Array[512, 512]
|
This example introduces the arrow syntax for calling methods. The statement a->set,image says:
"Call the method named set on the object variable named a, and pass the argument variable named image."
We apply the same syntax when calling the get method except that we invoke it as a function and return the value into the output variable image2.
Next, let's try inserting and extracting a data structure such as the system variable !d:
IDL> a->set,!d IDL> var=a->get() IDL> help,var,/st ** Structure !DEVICE, 17 tags, length=88: NAME STRING 'X' X_SIZE LONG 640 Y_SIZE LONG 512 X_VSIZE LONG 640 Y_VSIZE LONG 512 X_CH_SIZE LONG 6 Y_CH_SIZE LONG 12 X_PX_CM FLOAT 40.0000 Y_PX_CM FLOAT 40.0000 N_COLORS LONG 16777216 TABLE_SIZE LONG 256 FILL_DIST LONG 1 WINDOW LONG 0 UNIT LONG 0 FLAGS LONG 328124 ORIGIN LONG Array[2] ZOOM LONG Array[2] |
In this example, we insert the variable !d into the
object and then retrieve it into the variable var.
Note that we only create the object variable once, and recycle it as
necessary. We can of course create as many data objects as we like
and store different data types accordingly. Just remember to give them
different variable names.
As we have already seen, we can add new methods to an object by editing its class definition file. We can make the data object more useful by giving it the ability to read data from a file and plot the data. In the following example, we open the file data__define.pro and add two methods that we conveniently call data::read and data::plot:
pro data::read,file if n_elements(file) ne 1 then return ;-- at least one file name entered check=findfile(file,count=count) ;-- check if file exists if count ne 1 then return ;-- bail if not there image=fltarr(512,512) ;-- assume a 512x512 image file openr,lun,file,/get_lun ;-- open file readf,lun,image ;-- read image free_lun,lun ;-- close file self->set,image ;-- insert image into object return end ;--------------------------------------------------------------------- pro data::plot value=self->get() ;-- extract data value from object dsize=size(value) ;-- determine data dimensions if dsize[0] eq 2 then tvscl,congrid(value,512,512) ;-- if 2-dimensional, CONGRID and TVSCL it return end |
The read method accepts a file name as its argument. As is good practice, we check if the filename argument is entered and use IDL's findfile to test if the file actually exists. We subsequently open the file, read the data, and insert into the object using the set method call: self->set,value. Note that because we are referencing the object itself, we use the self variable name for the object.
The plot method extracts the data value from itself via the get method call: self->get(). It checks that the data is a 2-dimensional image using the IDL size function, and plots it with a call to IDL's tvscl command and congrid, which expands the image to a 512x512 array size. To demonstrate this sequence of steps, let's create an image file image.dat in the current directory and deploy the data object as follows:
IDL> image=findgen(512,512) ;-- create 512x512 image array IDL> file='image.dat' IDL> openw,lun,file,/get_lun ;-- write image to file IDL> printf,lun,image IDL> free_lun,lun IDL> .run data__define ;-- recompile class definition file IDL> a->read,file ;-- read image and display it IDL> a->plot |
The call to the plot method produces the following simple image:
Note that it is not necessary to reinitialize the data object since
we are using the same object variable to store the image data.
However, it is necessary to recompile the class definition file
since we have added new methods to it.
Looking at the last two lines in the previous example, it doesn't appear from our data object example that we have advanced very far using OOP techniques. In particular, compared to the opening example of reading and plotting data using non-OOP procedures, it seems that a lot of effort was invested in writing object methods that essentially reproduce the same functionality as conventional procedure calls.
The real power of OOP techniques comes not in what we have just done, but in what we are about to do. The data object that we have created is a building block that can be used to develop objects that perform more complicated functions. Consider the following problem:
"I have an image in a FITS file that I would like to read and display. I would also like to remember the name of the FITS file so that I can track it."
The data object that we have created provides a convenient storage facility for FITS image data, but it lacks the required FITS file reader and it doesn't have a way of remembering the file name. We could of course re-edit the data class definition file to add this functionality, but that would involve much more work. The OOP solution to the problem is to define a new class that somehow inherits the functionality of the data class. The following is how to do it.
We define a new class called fits by creating a file named fits__define.pro, which contains the lines:
pro fits::read,file

 if n_elements(file) ne 1 then return   ;-- at least one file name entered
 check=findfile(file,count=count)       ;-- check that file exists
 if count eq 0 then return
 image=mrdfits(file)                    ;-- call Astronomy library FITS reader
 self->set,image                        ;-- insert image data into property
 self.filename=file                     ;-- save filename in property
 return

end

;-------------------------------------------------------------------------

pro fits__define

 void={fits,filename:'', inherits data} ;-- inherit from data class
 return

end
|
Several new concepts are happening here. Let's start from the bottom up.
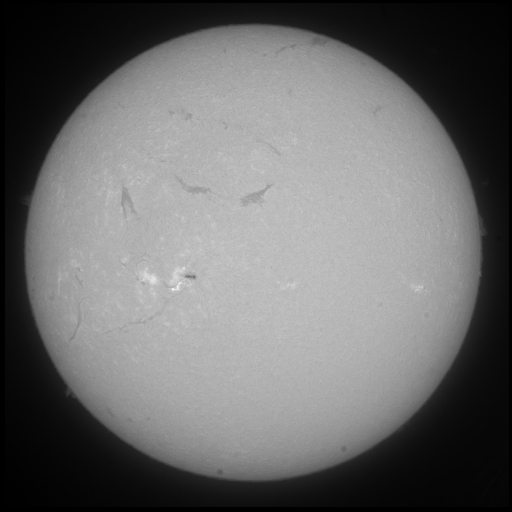
In OOP language, the fits class is a derived class of data, and a fits object is referred to as child of the parent data object. The following example demonstrates how to use the fits class to create an object to read a Big Bear H-alpha image contained in the file bbso_halph_fl_20040310_173531.fts:
IDL> file='bbso_halph_fl_20040310_173531.fts'
IDL> f=obj_new('fits')                 ;-- create object
IDL> help,f
F             OBJREF    = ObjHeapVar37(FITS)

IDL> f->read,file                      ;-- read file
IDL> f->plot                           ;-- plot data
IDL> image=f->get()                    ;-- extract image
IDL> help,image
IMAGE            INT       = Array[512, 512]
|
We create a fits object using the obj_new function, and feed it the FITS file name. After reading, we plot the image, and extract the image data using the get method. As defined, the get method inherited from the data class only allows us to extract the data value from the property pointer. However, we would also like to extract the filename that is associated with the data, which is also a property. To include this functionality, we override the get method in data__define.pro with a new get method in fits__define.pro as follows:
function fits::get,filename filename=self.filename ;-- copy filename in variable image=self->data::get() ;-- call DATA's GET method to return data return,image end |
The above lines illustrate the simplicity and elegance of inheritance. We have added a new output argument filename in which we return the string value of the filename, which is saved in the property self.filename. Since we also wish to return the data value, we include a call to the get method that we have already defined for the data class. There is no need to rewrite the latter. Hence, in the last example, we can execute the following:
IDL> data=f->get(filename) IDL> help,data,filename DATA INT = Array[512, 512] FILENAME STRING = 'bbso_halph_fl_20040310_173531.fts' |
Note also that the fits object methods (read and
get)
retain the same names as their parent data method names. The difference
is in their behaviors, which depends upon which data type is being operated
on. This ability to behave differently depending upon class (or data type) is called
polymorphism.
The example classes in this tutorial demonstrate how objects can be designed, created, and used. If interested in experimenting with these classes, you can download complete definition files via the following links: data__define.pro and fits__define.pro. Although useful for illustrative purposes, these classes are too simplistic for handling more complicated solar datasets. For example, not all solar datasets conform to the FITS format standard. Variations in the use of header keyword names and values often require the use of special readers. Moreover, different datasets usually require the application of instrument-specific processing algorithms inorder to be useful. This dependence of operations upon the properties of the dataset naturally lends itself to the use of objects as a tool for analyzing solar data.
IDL> files='efr20040309.072550' IDL> read_eit,files,index,data ;-- read EIT QL file IDL> eit_prep,index,data=data,outindex,outdata ;-- prep data IDL> index2map,outindex,outdata,emap ;-- create map IDL> eit_colors,195 ;-- load 195 color table IDL> plot_map,emap,/log,grid=20,/limb ;-- plot map |

This example highlights several points. Even though we are primarily interested in reading and plotting an EIT image, we have to know and perform several steps:
What we need is a map class that will allow us to define map objects to store data such as EIT images and provide methods to manipulate them. Such a class already exists. It is defined in the file map__define.pro. The map class is analogous to our example data class except that it uses a map structure to store data and its corresponding properties (such as pointing).
Now consider the following OOP approach to the same example:
IDL> file='efr20040309.072550'
IDL> eobj=obj_new('eit')                         ;-- create an EIT object
IDL> eobj->read,file                             ;-- read EIT file
IDL> eobj->plot                                  ;-- plot EIT image
|
The above example produces exactly the same plot output as the conventional example, but what is different? Let's take it in steps:
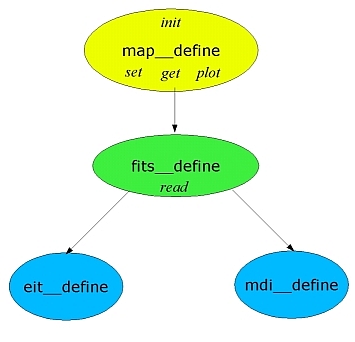
In summary, the object variable eobj object is a map object since the eit class is derived from a map class. The details of the relationship between eit and map classes are not overly important to the average user who is interested in performing basic data analysis. The main point is that, by using an eit map object, the overhead of remembering several instrument-specific procedure names is significantly reduced.
The eit class has a get method that provides access to the EIT image data and map structure as follows:
IDL> edata=eobj->get(/data) IDL> help,edata EDATA INT = Array[1024, 1024] IDL> emap=eobj->get(/map) IDL> help,/st,emap ** Structure <40e0fb08>, 13 tags, length=2097256, refs=2: DATA INT Array[1024, 1024] XC FLOAT -8.15294 YC FLOAT 21.0663 DX FLOAT 2.63500 DY FLOAT 2.63500 TIME STRING ' 9-Mar-2004 07:24:58.402' ID STRING ' Rocket Science EIT 195' ROLL_ANGLE FLOAT 0.00000 ROLL_CENTER FLOAT Array[2] DUR FLOAT 12.5970 XUNITS STRING 'arcsecs' YUNITS STRING 'arcsecs' SOHO BYTE 1 |
The pointing information contained within a map structure allows us to analyze different images regardless of the image source. By making a map structure a property of a map object, we simplify the steps involved in performing typical image processing operations. We will conclude this tutorial by demonstrating three such operations: rotating an image; correcting for differential solar rotation; and overlaying images.
IDL> robj=eobj->rotate(45) IDL> robj->plot |
In this example, we rotate the EIT image contained in the eit map object eobj by 45 degrees to create a new map object robj which produces the image:

IDL> dobj=eobj->drotate(5,/days) IDL> dobj->plot |
In this example, we solar rotate the EIT image forward in time by 5 days to produce the image:

IDL> file='mdi_maglc_re_20040310_2102.fts'
IDL> mobj=obj_new('mdi')                         ;-- create an MDI object
IDL> mobj->read,file                             ;-- read MDI file
IDL> mobj->plot                                  ;-- plot MDI image
|
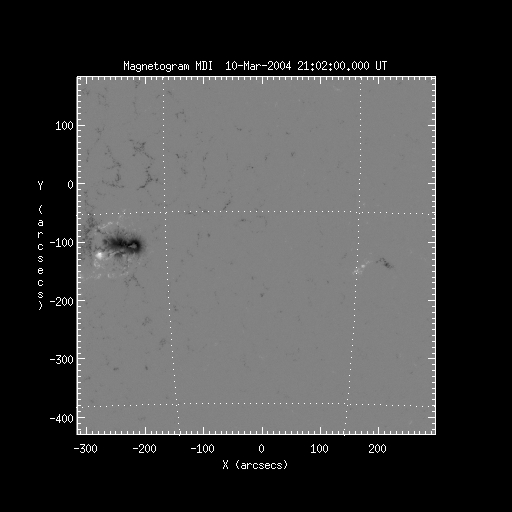
Note how the steps for reading and plotting the MDI image are identical to those for EIT. The internal details of how these steps are performed are handled by the corresponding methods. Having created eit and mdi objects, the final step of overlaying their corresponding images is reduced to the following single line:
IDL> eobj->plot,/over,/drotate    ;-- overlay EIT image on previous MDI image
                                  ;   (correcting for solar differential rotation)
|

In this example, we used the /drotate keyword to differentially rotate the EIT image contours to the same time as the base MDI image.
IDL> mobj=obj_new('mdi')
IDL> mobj->read,'mdi_maglc_fd_20040522_0005.fts.gz'
IDL> cobj=mobj->extract()
IDL> cobj=mobj->extract(xrange=[-500,500],yrange=[-500,500])
|
In this example, we read an MDI full-disk image in the file mdi_maglc_fd_20040522_0005.fts.gz, and call extract without any keywords. A box-cursor is used to select a sub-field. Alternatively, the keywords: xrange and yrange can be used to specify the sub-field.
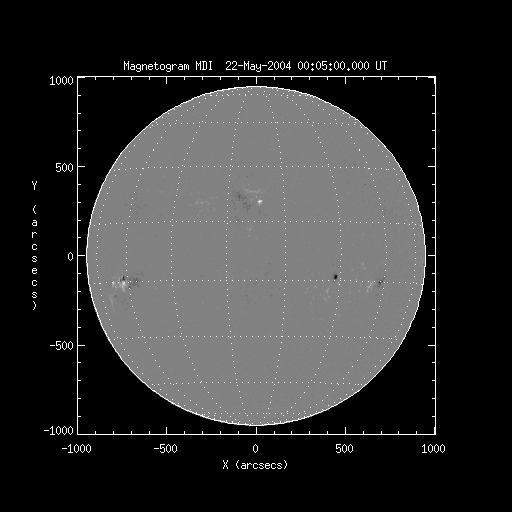
MDI Full Disk |

MDI Partial Disk |